CHAPTER FOUR

DIMENSIONAL STANDARDS AND ADJUSTMENTS

This chapter deals with the important dimensional standards for maximum performance of your RHODES Piano and adjustments available to maintain that performance.

  1. Key Dip. The distance of downward travel of the Key Front (Figure 4-1, 1) is called "Key Dip." This dimension should be 3/8" ± 1/32", that is, from 11/32" to 13/32" (9.525 ± 0.794mm or 8.731mm to 10.319mm).

Rhodes Modular Action - Single Key Depressed

Figure 4-1. RHODES Modular Action - Single Key Depressed

CAUTION

When Key Dip is changed, reestablishment of Escapement
and Striking Line is required.
  1. Escapement. The gap remaining between the Hammer Tip and the Tine (Figure 4-1, 3) with the Key depressed is called "Escapement". This Dimension varies from the extreme Bass (left) Tone Bar to the extreme Treble (right) Tone Bar and should be as follows (Figure 4-2).

Escapement Distances

Figure 4-2. Escapement Distances

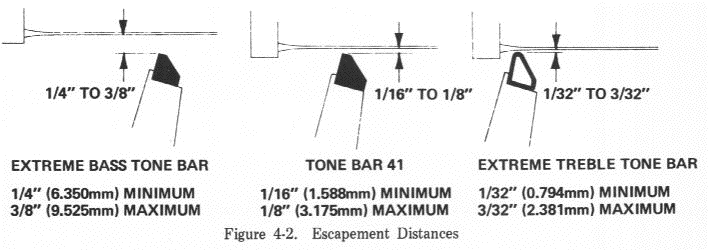
The philosophy behind this variation is that while the ideal Escapement for the most responsive touch is 1/32" (0.794mm), the whipping action of the Tine in response to the Hammer blow increases as it becomes longer toward the Bass end of the Keyboard making this ideal setting impossible.

In order to maintain touch sensitivity through Escapement variation, the Neoprene Hammer Tips are graduated in height as well as hardness from extreme Bass through extreme Treble.

There are presently five gradation of hardness in the Hammer Tips and therefore, corresponding height differences. They are:

Hammer Tip Number Durometer Reading
(Hardness)
Height
1 through 30 30 1/4" (6.350mm)
31 through 40 50 5/16" (7.938mm)
41 through 50 70 3/8" (9.925mm)
51 through 64 90 7/16" (11.112mm)
65 through 88 Wrapped (extra hard) 7/16" (11.112mm)

As is apparent from the above chart, there is a 1/16" (1.588mm) height increase from one Hammer Tip section to the next, except in the extreme Treble area, or 3/16" (4.762mm) overall Hammer Tip height increase from Bass to Treble (left to right).

The precise change points of the Hammer Tips are subject to individual taste. While the factory settings are listed above, some musicians prefer to continue the Tips of the 90 durometer clear up to Hammer Number 67 or beyond. This is done to avoid the sharp change in tone characteristics experienced as a result of the difference in Tip hardness. This provides further opportunity for customizing in accordance with individual taste.

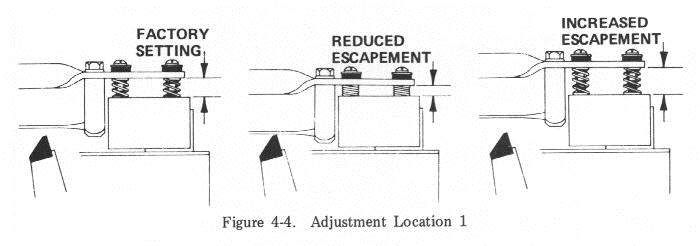
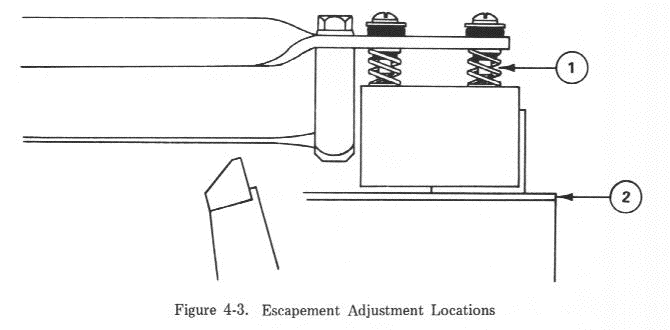
A quick glance at Figure 4-3 will reveal that there are two ways of achieving a fine, custom adjustment of the Escapement Distances.

Escapement Adjustment Locations

Figure 4-3. Escapement Adjustment Locations

    1. Each of the Tone Bar Assemblies is separated from the Tone Bar Rail by two adjustable coil Springs. By means of these, the height of each Tone Bar Assembly can be raised to 1/2" (12.700mm) or lowered to 3/16" (4.762mm) - factory setting is 3/8" (9.525mm). From Figure 4-4 it can be observed that this adjustment increases or decreases the Escapement Distance.

Adjustment Location 1

Figure 4-4. Adjustment Location 1

NOTE

Any major change of adjustment by this means requires
re-alignment of Timbre, Volume and Damper Settings.
    1. Adding or subtracting shims from the Harp Supports (Figure 4-3, 2) should be resorted to ONLY for the purpose of establishing Escapement at the extreme Bass (left) Tone Bar (1/4" minimum to 3/8" maximum) (6.350mm minimum to 9.525mm maximum) and the extreme Treble (right) Tone Bar (1/32" minimum to 3/32" maximum) (0.794mm minimum to 2.381mm maximum).

Having been introduced to the adjustments available to you in achieving the best Escapement settings for optimum touch response, you should strive to tailor the Escapement settings in accordance with the particular style of play employed by the person who plays the Instrument. A sensitive musician will be looking for extremely close settings in the Mid- and Upper-range. A musician who plays heavy, strong octaves in the Bass area will require even greater Escapement distances in the left hand area. Thus, you now have the tools to customize the action to the individual tastes and needs of the musician.

  1. Damper Clearance. Although the Bridle Strap is part of the Hammer Assembly, it functions as an integral part of the Damper System. It is designed to engage a 'Hook" which is formed into the arm of the Damper Module at approximately its mid-point. As the Hammer swings upward, the Bridle Strap pulls the Damper Arm downward thus disengaging the Damper Felt from the Tine. As the Hammer Tip strikes the Tine, the Damper is at the point of maximum Clearance (Figure 4-1, 4) allowing the Tine to vibrate unimpeded. Damper Clearance should be 3/8" to 1/2" (9.525mm to 12.700mm).

  2. Damper Module Adjustment. The Damper Module is subject to easy adjustments. With the Hammer in its rest position, the Damper Felt (Figure 2-3, 16) should bear against the Tine sufficiently firm so that the sound will be damped immediately following the Hammer blow. Conversely, the Damper ideally clears the Tine by at least 3/8" to 1/2" (9.525mm to 12.700mm) when the Key is depressed.

    To maintain this relationship, there are two adjustments possible.

    1. Tension. Each Damper Arm is actually a Leaf Spring. Tension can be increased or decreased by "ironing" a slight curve in the part with your two fingers. Another way is to pull upward or downward on the arm at Point "A" (Figure 4-5). Added tension will result in a stiffer Damper response.

    Rhodes Damper Arm - Tension Adjustment

    Figure 4-5. RHODES Damper Arm Tension Adjustment

    1. Alignment. With Tension thus established, proper Damper coordination is achieved by bending the forward portion of the Damper Arm up or down (Figure 4-6).

    Rhodes Damper Arm - Alignment Adjustment

    Figure 4-6. RHODES Damper Arm - Alignment Adjustment

    There are four possible conditions which could result in malfunction.

    CONDITION SOLUTION
    The Tine is out of adjustment in its vertical aspect (Escapement). The factory setting places the Tines slightly above dead center of the Pickup. See Timbre Adjustment, Page 4-7.
    The Damper Release Bar is bearing down excessively, thus disengaging or partially disengaging the Damper from the Tine. See Damper Push Rod Assembly, Page 2-2.
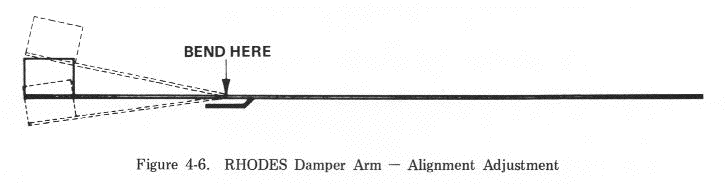
    The Damper Arm has sustained damage sufficient that it no longer bears firmly against Tine (Tension). Remove Damper Release Bar and disengage Bridle Strap. With Damper Arm thus free, note if it assumes a position similar to the neighboring Arms. If so, bend upward slightly on the surface nearest the point where it is mounted to Action Rail. The aluminum is of an alloy purposely chosen to invite this type of adjustment. Caution should be exercised to avoid excessive correction which would result in some loss of touch control due to the strong resistance thus introduced in opposition to the upward travel of the Hammer.
    The leading edge of the Damper has been bent downward. The leading edge referred to is that portion of the Damper Arm which extends forward from the Bridle Strap tongue and thus actually provides adjustment possibilities in terms of higher or lower setting of the Damper Felt (Alignment). With Bridle Strap in place and having determined that none of the first three conditions exist, notice whether the particular Damper Felt is in approximate vertical alignment with the neighboring Felts. If not, with the fingers of two hands, bend this portion of the Damper Arm upward while exercising care that in doing so, you do not disturb the configuration of the back portion of the Damper Arm, and thus inadvertantly introduce the previous condition.


    1. Striking Line. "Striking Line" is the term used to describe the best place along the length of each Tine to aim the striking edge of the Hammer. Like the "sweet spot" of a baseball bat, there is a point of maximum response. This was determined by a painful trial process and resulted in the precise curve given to the Tone Bar Rail.

      Proper Striking Line is assured by setting the Harp in such a way as to arrive at an approximate dimension of 2-1/4" (57.150mm) between the leading edge of the Hammer Tip and the leading edge of the Tone Generator (Figure 4-1, 2). This dimension should be taken at the extreme Bass (left) Tone Bar. At the extreme Treble (right) Tone Bar, this dimension is approximately 1/8" (3.175mm).

    RE-ESTABLISHING STRIKING LINE

    1. Remove the Harp/Keybed Assembly from the Cabinet following procedures outlined in Chapter Three.

    2. To re-establish proper Striking Line, remove two (2) Harp Mounting Screws (Figure 4-7) on the Bass (left) side of the Harp and one (1) Harp Mounting Screw on the Treble (right) side of the Harp located closest to the Keys. Loosen but do not remove the remaining Screw. In addition, remove one (1) Harp Pivot Link Mounting Screw on the Bass (left) side of the Harp which attaches the Harp Pivot Link to the thread-grooved slot formed in the side of the Harp Support.

    Rhodes Harp/Action Assembly

    Figure 4-7. RHODES Harp/Action Assembly

    1. While striking Middle C, slide the Bass (left) side of the Harp forward and back until ultimate tone clarity and volume response is achieved. Move on to F below Middle C then to C below Middle C following the same procedure. Because of the precise curve of the Harp, when these three notes satkfy your ear, all others will be within tolerable limits.

    2. When the new Harp location has been established, use extra holes provided or sink new holes through the steel Harp Frame and through the top surface of the aluminum Harp Supports using a #7 drill. Secure the Harp by re-installing the Harp Mounting Screws.

    3. Attach the Harp Pivot Link by re-installing the Harp Pivot Link Mounting Screw along the thread-grooved slot on the side of the Harp Support.

    4. Mount the Harp/Keybed Assembly in the Cabinet by reversing the disassembly procedure outlined in Chapter Three.

    TIMBRE ADJUSTMENT

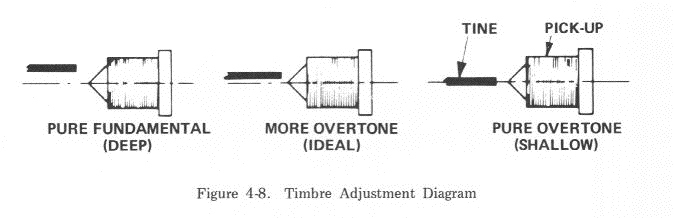
    Timbre Adjustment is accomplished by manipulating the Timbre Adjustment Screw (Figure 2-1, 9) until the end of the Tine rests on a plane slightly above dead center of the Pickup (Figure 4-8). Let your ear guide you in this procedure.

    Timbre Adjustment Diagram

    Figure 4-8. Timbre Adjustment Diagram

    VOLUME ADJUSTMENT

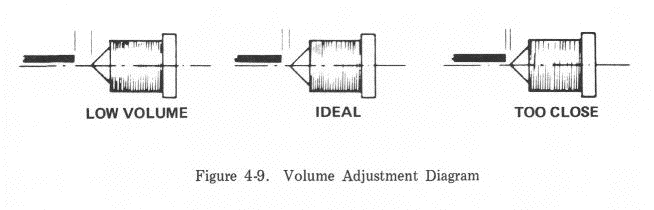
    Slide Pickup Arms in or out to establish a gap between Pickup and Tine of between 1 16" (1.588mm) and 1/8" (3.l75mm) as shown in Figure 4-9.

    Volume Adjustment Diagram

    Figure 4-9. Volume Adjustment Diagram

    It should be noted that the smaller the gap between Tine and Pickup, the greater the volume of sound. More important -- the more pronounced the DYNAMIC RESPONSE.

    By Dynamic Response is meant "percentage of volume increase in response to increased weight of touch." In Pianos built since March 1972, a gap of 0.020" (0.5080mm) can be accommodated in the middle and upper ranges.

    NOTE

    When Timbre and Volume Adjustments are made,
    Pitch should be re-established. See TUNING THE
    RHODES PIANO, Page 5-1.

    TOC - 1 - 2 - 3 - 4 - 5 - 6 - 7 - 8 - 9 - 10 - 11