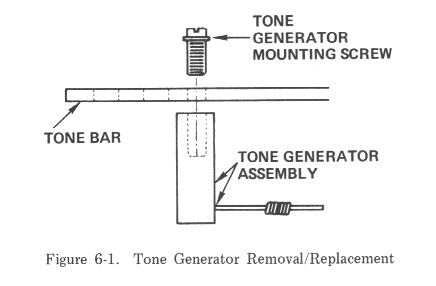
TONE GENERATOR ASSEMBLY REPLACEMENT PROCEDURE
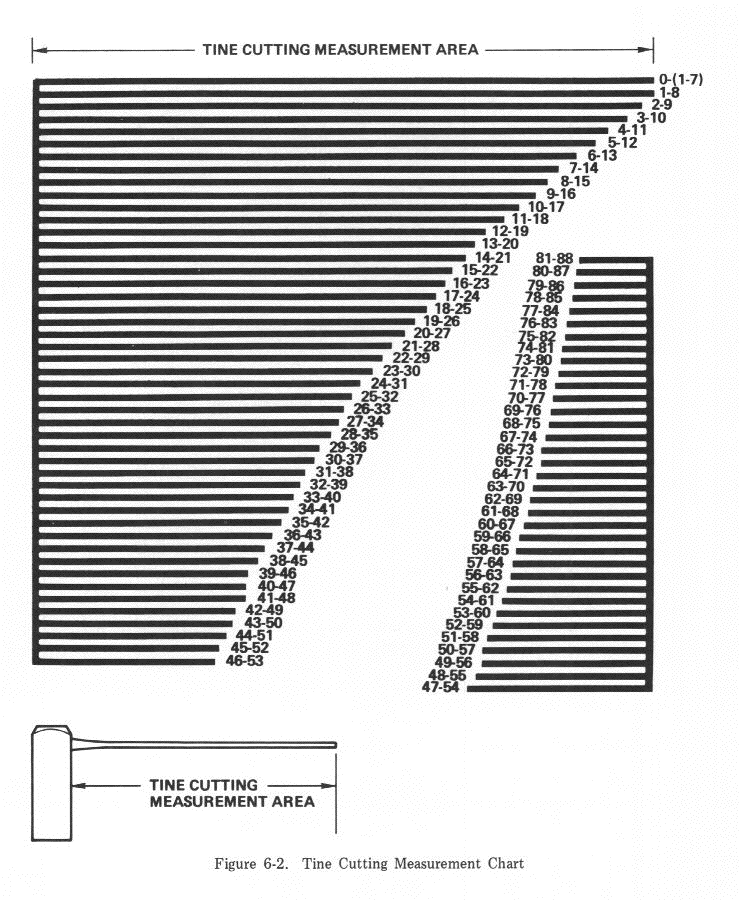
Since all Tines throughout the pitch range are of the same configuration and vary only in length, and since the Tines can easily be cut to size by means of a pair of side cutter pliers, it follows that all the musician needs is a set of replacement Tines.
To aid the musician, replacement Tines are packaged in Kits of six. In each Kit is an assortment of Tuning Springs and a complete cutting chart.
Each of the six Tines comes already pressed into the little cross-piece called the Tone Generator. Thus, the two parts when joined together become the "Tone Generator Assembly." The Kit then is known as the Tone Generator Assembly Replacement Kit.
NOTE
Originally, RHODES manufactured only a Seventy-three Key
Model Piano and Tone Generator Assemblies were identified
on the Tone Bar as Number 1 through 73. In actuality, our
Seventy-three Keys are E8 through E80 as compared to an
Eighty-eight Key Piano whose keys are identified Al through
C88.
When manufacture of our Eighty-eight Key Pianos was begun,
our problem of identifying the seven notes preceding our
Number 1 (E8) was solved by designating all seven as Num-
ber 0 since the Tone Bars were identical.
Since, we have determined that conformity to the industry
standard would be less confusing. Therefore, Tone Bar
Assemblies (which include Tone Generator Assemblies) will
be identified on our Eighty-eight Key Pianos as 1 through 88,
and on our Seventy-three Key Pianos as 8 through 80.
To perform the replacement procedure, you will need the following tools:
Complete replacement requires only the following simple steps.
Since absolute contact between the Tone Generator and the Tone Bar is necessary, the Tone Generator Assembly Mounting Screw is installed at the factory with power equipment. In some cases, removal of this screw will seem almost impossible; however, it can be accomplished in the following manner:
In the event that a bench vise and a 5/16" (7.938mm) ratchet wrench are not available, the Tone Bar may be held in one hand while loosening and removing the Tone Generator Mounting Screw with the other using a 5/16" (7.938mm) box-end wrench.
Tone Generator Assembly Replacement requires only the reversal of the preceeding procedure.
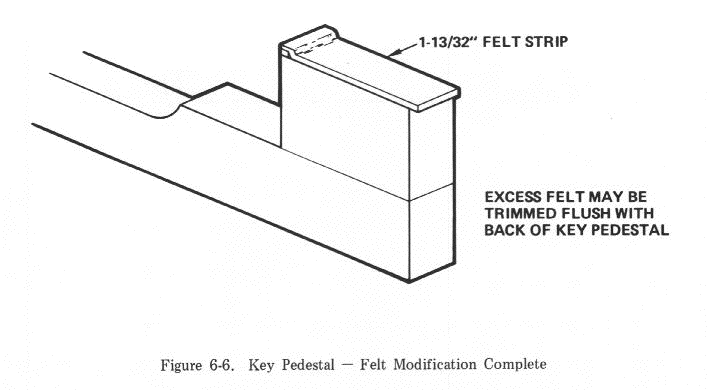
KEY PEDESTAL MODIFICATION PROCEDURE
In June 1978, the present Key Pedestal configuration (Figure 2-1, 38) was incorporated into the Piano. This development provides smoother, faster action or feel. Pianos built prior to that time may be modified by carefully pursuing the following procedure.
Materials required for this procedure are:
Prior to using the Silicon Spray and Naphtha Based Solvent,
place a drop of each on the side of a Hammer to determine
that no adverse effect will result from the chemical reaction
with the plastic.
After the Piano has been completely reassembled, check for Escapement (Page 4-1) and determine that a "Double-Stroking" condition does not exist.
WORN KEY BUSHING REPAIR PROCEDURE
After years of normal use, the Balance Rail Key Button and Front Pin bushings will show wear, causing the Keys to move sideways creating the sensation of a "sloppy action".
By the use of the proper tools and techniques, this can be easily cured, giving the piano a tight, "like new" feeling.
The easiest method is achieved by the use of a piano technician's tool, called a Key Bushing Tightener (Figure 6-7).
To use this tool, all that is necessary is to remove the Keys and place them on a flat surface. Then insert the tool into each affected slot, and gently tap the top of the tool with a hammer. This will cause the Key wood to be squeezed toward the center, making the gap for the guide pin smaller. Replace the Keys in the Piano.
If a Bushing Tightener is not available, approximately the same effect can be accomplished with a pair of strong needle-nose pliers.
With the pliers, carefully squeeze the wood together at each bushing slot (too much force can break the wood) causing the bushings to be squeezed inward.
The third technique is to replace the bushings.
With a sharp knife, carefully trim away the worn bushings. Then apply a white glue to each side of the bushing slot. Install new felt (obtainable from any piano supply house) and clamp the felt in place with a key bushing wedge, or clamp. (The Bushing Tightener can be used for this purpose also.) After the glue has dried, trim away the excess felt and replace the Keys in the Piano.
An alternative to the felt bushing is plastic bushing inserts. Instead of installing felt after the glue is applied, press in the plastic inserts. After the glue dries, replace Keys in Piano.
After any bushing tightening or replacement, always make sure the bushings are not too tight, and that the Keys do not stick.
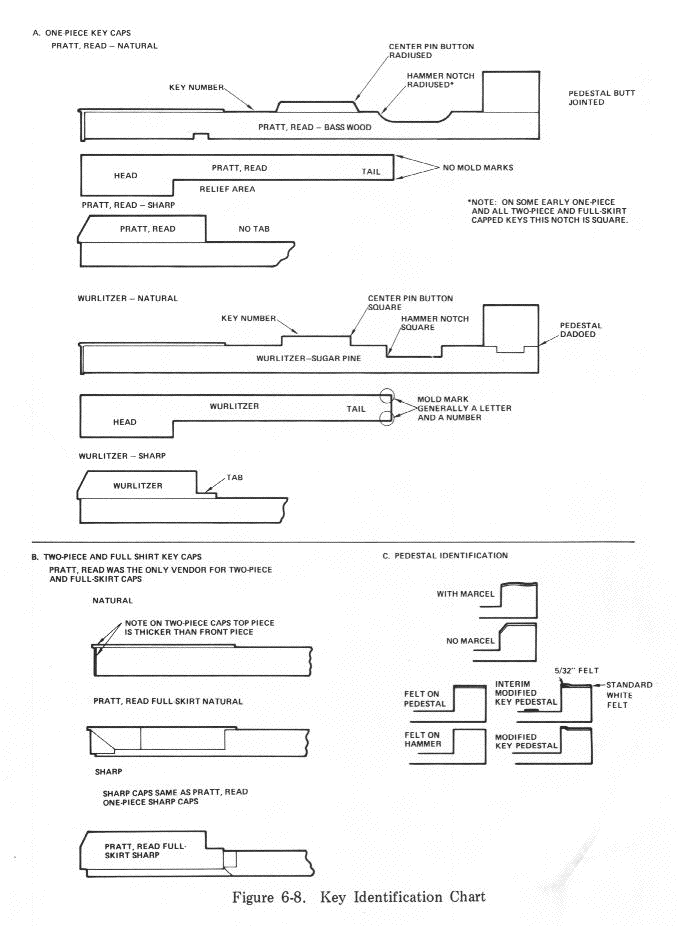
KEY CAP REPLACEMENT PROCEDURE
Periodically a customer will request a new Key because some blow has caused a fracture, or a cigarette burned one or more of the Key Caps.
Instead of replacing a Key, it is a standard practice of piano technicians to resurface, or recap the Key.
To resurface a Key, it is first necessary to identify the Key and its Cap style. Refer to Key Identification Chart (Figure 6-8), Page 6-10.
Once the Key Name, manufacturing type (Cap thickness), and Cap style have been determined, you can then proceed with removing the damaged Cap.
The same type of white key cement can be used for the One-piece, Two-piece or Full-skirt style Cap. Because the surface of the Key where the Cap adheres to the wood is visible, a glue that dries white is preferred for the One- and Two-piece style cap.
Piano key cement is available at piano parts and supply companies. If piano key cement is not readily available, Duco cement will work acceptably.
If white piano key cement is not available, you can make a glue that dries white by mixing Duco cement with 30% acetone and adding small Key Cap chips and shavings from the broken Key Caps. Place the Duco in a sealable container. Add enough acetone to increase the total volume 25% to 30%. Add in the broken chips and stir. As the chemical dissolves the plastic, continue to add more chips and allow them to dissolve. Continue stirring and adding chips until you are satisfied with the color of the glue. Before using the glue, make sure all plastic chips are dissolved. The texture should be thick and smooth, about the consistency of syrup.
FULL-SKIRT TYPE KEY CAP
To replace the Full-skirt type Cap (Figure 6-8, B.), it is first necessary to remove the old Cap. Since the Cap is damaged, it is of no consequence if you break the Cap further when you remove it. Using pliers and a sharp knife, break the Cap off, piece by piece, all the white being careful not to chip or otherwise damage the Key itself.
After the old Cap is removed, sparingly apply piano key cement to the appropriate part of the Key.
After the glue has been applied, slide the Cap on to the Key, making sure that it is pushed in place so that the end of the Key is against the inside front of the Cap. Put rubber bands around the Key to hold the Cap firmly in place until the glue dries.
ONE- AND TWO-PIECE TYPE KEY CAP
Basically, replacing the One-piece (Figure 6-8, A) and the Two-piece (Figure 6-8, B) type Key Caps is the same as replacing the Full-skirt type Cap. However, the technique does vary slightly in the removal and clamping processes since the One- and Two-piece Caps cover only the top and front of the Key.
To remove the Cap, a sharp X-acto type knife is used to cut between the Cap and the wood of the Key. Always slice with the grain of the wood so as to minimize cutting the wood.1 Carefully slide the knife between the Cap and the Key. Moving slowly with light pressure, slide the knife under the Cap from one end of the Key to the other, causing the Cap to come loose from the Key but not peeling or cutting any wood from the Key itself.
For the One-piece type Cap (and the front of the Two-piece type if removal is necessary) also slide the knife between the front of the Key and the Cap, carefully removing the front of the Cap without damaging the Key.
After the Cap has been removed, scrape or sand the glue and Cap residue from the Key. Also make sure any damage to the Key is repaired (add wood putty to any gouges, etc.). Make sure the Key surface is as smooth and level as possible.
Apply the glue liberally to the surface that is being capped. Spread the glue so that there are no air gaps.
Carefully place the new Cap on the Key. Slide the Cap across the Key slightly to help spread the glue. Align the new Cap on the Key so that there is equal overhang on both sides of the Key and that the relief area of the head of the Cap is flush with the relief area of the head of the Key. The head of the Cap at the front should then overhang the front piece (on a Two-piece Cap) by approximately 1/16" (1.588mm). On the One-piece Cap, the front should be firm against the front of the Key and the Cap should be centered so that there is equal overhang on both sides of the Key. After the Cap is properly aligned, clamp the Cap in place with spring clamps and a block or plate2 to keep the clamps from scratching the plastic Cap. After the clamps and blocks are in place, make sure the Caps are still properly aligned and realign if necessary. Set the Key aside and allow appropriate time to dry, which will depend on the glue used.
After the glue has dried, remove the clamps and blocks and trim down the excess overhang on the sides of the Key with a flat file (a Vixen-type file does a very quick and neat job). File away the excess plastic until the Cap is flush with the sides of the Key. For a nice smooth appearance, scrape (with an X-acto type knife) or sand away file marks in the plastic and round off the front corners of the head of the Cap.
The Key is now ready to be replaced in the Piano.
1. Heating the plastic Cap with a heat gun will soften the plastic to allow easier removal.
2. Spring clamps and plates for the tops and fronts are available from piano supply companies.